Hurricane Shutters Installation
Your home's windows are probably different from those of your neighbors. So, why would you want the same Hurricane panels they have? At DIY Hurricane Supply, we customize the panels and tracks to fit your home's specific needs. This customization doesn't increase the price because we receive the best factory-direct pricing and pass the savings on to you. Plus, since you'll be doing the DIY installation, there are no contractor costs to factor in.
|
DIY Hurricane Supply is unique in that it offers a custom product at a low price, all packaged together in a kit that fits your home's requirements. The easy-to-use components tracks, headers, and slide-in panels are simple to install. Your DIY Hurricane Supply kit even comes with the hardware! Plus, we're here to assist you throughout the installation process, from start to finish, with how-to videos, tutorials, and live FREE tech support.
Please make sure you have all the correct products listed on the packing slip before installing. Materials:
|
|
Procedure
Horizontal Installation
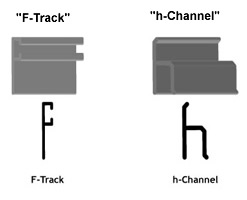
- Locate any obstructions (such as overhangs or protruding windowsills) that may interfere with the installation of the shutters. You may need to position the H Channel or F Track around the obstruction.
- Drill holes (if they are not already pre-drilled) into the H Channel (top) to secure it to the building.
- Measure the height of the panels and determine the necessary distance between the H Channel (top) and F Track (bottom).
- Determine the location of the F Track below the window or door. (It may need to be secured to an obstruction. If the obstruction protrudes 1" or more, you may need to secure a piece of wood below the obstruction to attach the F Track.) Attach the F Track to the building with ONE screw as close to the center of the F Track as possible.
- Ensure the F Track is level, then attach additional screws, starting at the center and moving outward. Secure with wing nuts. Match up the panels with the track and slide the F Track bolts into the track at each of the pre-drilled holes in each panel. Overlap the panels by at least one rise. Secure with wing nuts.
- Determine the location of the H Channel above the window or door. (It may need to be secured to an obstruction.) Attach the H Channel to the building with ONE screw as close to the center of the H Channel as possible.
- Ensure the H Channel is level, then finish inserting screws. Secure with wing nuts.
- Insert the top of the panels into the H Channel.
Removal: Remove wing nuts and panels, then slide the bolts out of the F Track. Store the pieces together for easy reinstallation.
Reinstallation: Match up the panels with the track and slide the F Track bolts into the track. Overlap the panels by at least one rise and secure with wing nuts. Insert the top of the panels into the H Channel.
 |
 |
Vertical Installation
- Locate any obstructions (such as overhangs or protruding windowsills) that may interfere with the installation of the shutters. You may need to locate the H Channel or F Track near the obstruction.
- Drill holes (if not already pre-drilled) into the H Channel (top) to secure it to the building.
- Measure the height of the panels and determine the distance needed between the H Channel (top) and the F Track (bottom).
- Determine the location of the F Track below the window or door. (It may need to be secured to an obstruction. If the obstruction protrudes 1" or more, you may need to secure a piece of wood below the obstruction to attach the F Track.) Attach the F Track to the building with ONE screw, as close to the middle of the F Track as possible.
- Ensure the F Track is level, then attach additional screws, starting at the center and moving outward. Secure with wing nuts. Match the panels with the track and slide the F Track bolts into the track through the pre-drilled holes in each panel; overlap the panels by at least one rise. Secure with wing nuts.
- Determine the location of the H Channel above the window or door. (It may need to be secured to an obstruction.) Attach the H Channel to the building with ONE screw, as close to the middle of the H Channel as possible.
- Ensure the H Channel is level and finish inserting the screws. Secure with wing nuts.
- Insert the top of the panels into the H Channel.
Reinstallation: Match the panels with the track and slide the F Track bolts into the track. Overlap the panels by at least one rise and secure with wing nuts. Insert the top of the panels into the H Channel.
Note:
For either installation method, panels can be overlapped by more than one rise, but they should always be overlapped by at least one rise for the most effective installation.
Special situations (such as protruding windowsills, overhangs, etc.) may require minor adjustments to the above instructions.